本文来自于我自己学习Flutter时所学习的教程的中文翻译,原文链接CREATING FULL-SCREEN DIALOG IN FLUTTER – WEIGHTTRACKER 2
此篇文章中的代码并不包括所有的代码改动,有部分细节没有给出,需要自行发现。
英语水平有限,内容未必准确
在这篇文章里我将一步步创建一个全屏的对话框(dialog)。像这样的全屏对话框比普通的对话框更适用于复杂的用户操作。你可以在Material Design的说明书中了解到更多内容。好在Flutter框架提供了非常容易的方法创建和使用全屏提示框。你可以在Flutter的Gallery app中找到它。
提供一个提示框是我的Weight Tracker应用的一部分(一个简单的体重跟踪应用),所以开发内容将以此为基础和目标。
创建基础UI
全屏提示框也是一个部件,跟一个普通的屏幕部件没什么不一样。所以我们准备使用基础的Scaffold部件创建它。
1
2
3
4
5
6
7
8
9
10
11
12
13
14
15
16
17
18
19
20
21
22
23
24
25
26
27
28
29
30
| import 'package:flutter/material.dart';
class AddEntryDialog extends StatefulWidget {
@override
AddEntryDialogState createState() => new AddEntryDialogState();
}
class AddEntryDialogState extends State<AddEntryDialog> {
@override
Widget build(BuildContext context) {
return new Scaffold(
appBar: new AppBar(
title: const Text('New entry'),
actions: [
new FlatButton(
onPressed: () {
},
child: new Text('SAVE',
style: Theme
.of(context)
.textTheme
.subhead
.copyWith(color: Colors.white))),
],
),
body: new Text("Foo"),
);
}
}
|
在actions属性中我们添加了一个FlatButton用于未来实现保存功能。
我们在FlatButton上添加了一个样式让按钮看起来跟状态栏样式相匹配。
打开一个对话框
为了打开对话框,我们要用到Navigator类,这是一个Flutter的工具用于控制界面和布局的导航流。我们可以用Navigator的push把一个新的页面加入导航栈,用pop来关闭。
1
2
3
4
5
6
7
8
| void _openAddEntryDialog() {
Navigator.of(context).push(new MaterialPageRoute<Null>(
builder: (BuildContext context) {
return new AddEntryDialog();
},
fullscreenDialog: true
));
}
|
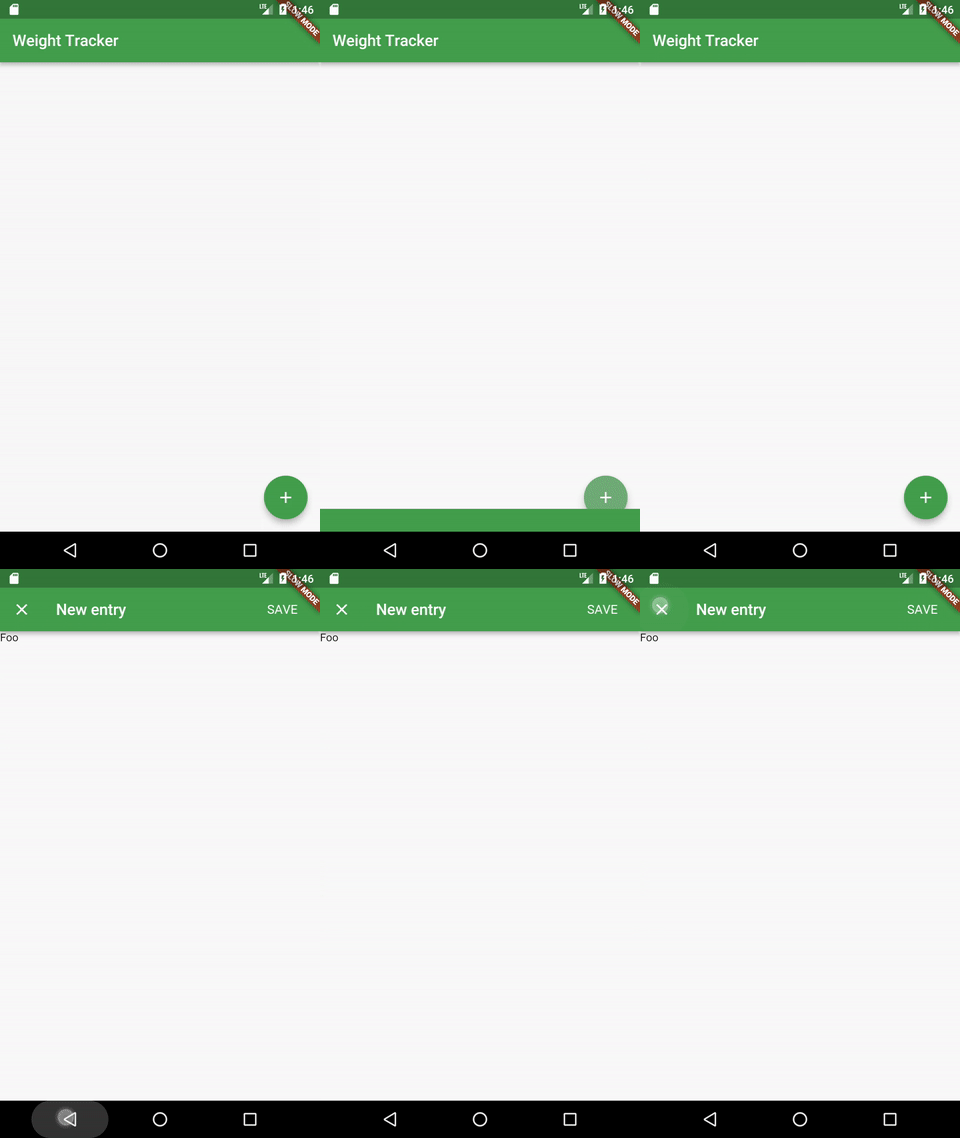
只有一个值得说明的是fullscreenDialog这个标记。设置它后页面左上角的默认的“返回箭头”标志会被替换为“关闭”。在iOS设备上这个页面的关闭动作同样会被右滑手势触发。
如果对Flutter如何管理导航和对我这个例子中使用的MaterialPageRoute是什么感兴趣,我非常推荐读一下官方对于这个类的文档。文档关于Flutter的导航写得非常清晰而且提供了所有能了解Flutter的导航的信息。
获取一个结果
全屏对话框常常用于添加/修改操作。考虑到这一点我们希望当用户点击SAVE(保存)时我们的对话框能返回一个数据。为了做到这样的效果我们需要用到更多的Navigation和Routing的功能。
在前一个代码例子中我们使用了一个MaterialPageRoute对象。Flutter的Routes(路由)被设计成能在它被推出(popped)导航栈后返回一个数据值。我们可以设定想要接收的返回数据的类型然后得到它,然后我们添加一些异步功能到我们的app中。
1
2
3
4
5
6
7
8
9
10
11
| Future _openAddEntryDialog() async {
WeightSave save = await Navigator.of(context).push(new MaterialPageRoute<WeightSave>(
builder: (BuildContext context) {
return new AddEntryDialog();
},
fullscreenDialog: true
));
if (save != null) {
_addWeightSave(save);
}
}
|
Navigator的push方法返回一个Feature(应该是作者的错别字)对象,像约定(promise)一定会有一个对象返回一样。在我们的例子里,我们希望对话框返回一个WeightSave对象。为了得到这个对象我们添加了await关键字来让代码执行到此外先暂停,等待异步的push方法返回一个结果。这个结果会在pop方法被调用时返回。在此之后我们检查一下是否返回了数据并将数据加入列表中。
1
2
3
4
5
6
7
8
9
10
11
12
13
14
15
16
17
18
19
20
21
22
23
24
25
26
27
28
29
30
31
32
33
34
| import 'dart:math';
import 'package:flutter/material.dart';
import 'package:weight_tracker/model/WeightSave.dart';
class AddEntryDialog extends StatefulWidget {
@override
AddEntryDialogState createState() => new AddEntryDialogState();
}
class AddEntryDialogState extends State<AddEntryDialog> {
@override
Widget build(BuildContext context) {
return new Scaffold(
appBar: new AppBar(
title: const Text('New entry'),
actions: [
new FlatButton(
onPressed: () {
Navigator
.of(context)
.pop(new WeightSave(new DateTime.now(), new Random().nextInt(100).toDouble()));
},
child: new Text('SAVE',
style: Theme
.of(context)
.textTheme
.subhead
.copyWith(color: Colors.white))),
],
),
body: new Text("Foo"),
);
}
}
|
在对话框类中我们可以很简单的调用Navigator.pop方法并提供一个返回的对象。如果我们没有指定返回的值或者我们用了其他的方法关闭了这个界面(比如按返回键)默认的返回值将会是null。
现在我们可以测试我们的对话框能否返回数据了。
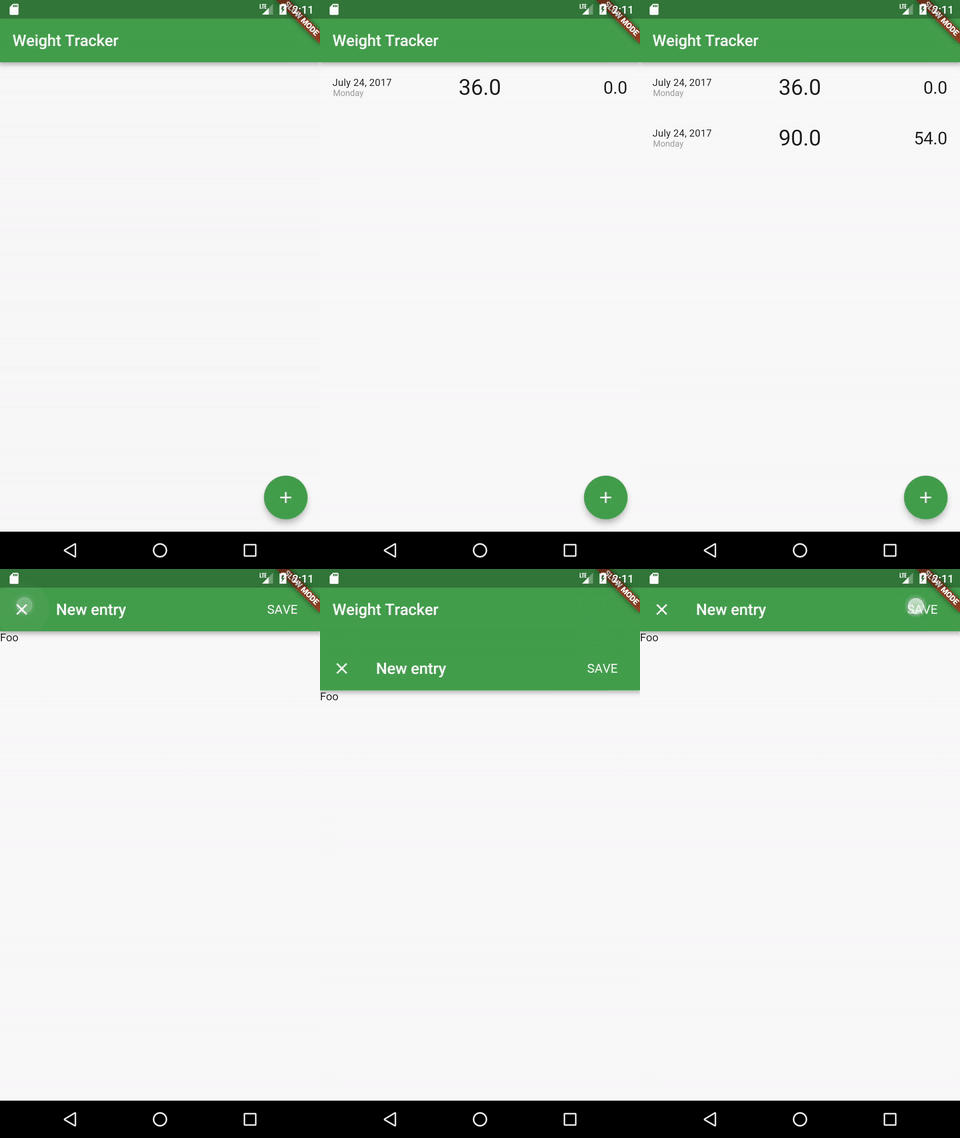
复杂的全屏对象框布局
现在是时候摆脱Foo这些字了。
我们主要的需求是让对话框能选一个日期和重量。我也可能需要添加一个备注。如果你对已经组装完成的控件感兴趣,在文章的底部有一个GitHub地址。
选择一个日期和时间
1
2
3
4
5
6
7
| new ListTile(
leading: new Icon(Icons.today, color: Colors.grey[500]),
title: new DateTimeItem(
dateTime: _dateTime,
onChanged: (dateTime) => setState(() => _dateTime = dateTime),
),
),
|
1
2
3
4
5
6
7
8
9
10
11
12
13
14
15
16
17
18
19
20
21
22
23
24
25
26
27
28
29
30
31
32
33
34
35
36
37
38
39
40
41
42
43
44
45
46
47
48
49
50
51
52
53
54
55
56
57
58
59
60
| class DateTimeItem extends StatelessWidget {
DateTimeItem({Key key, DateTime dateTime, @required this.onChanged})
: assert(onChanged != null),
date = dateTime == null
? new DateTime.now()
: new DateTime(dateTime.year, dateTime.month, dateTime.day),
time = dateTime == null
? new DateTime.now()
: new TimeOfDay(hour: dateTime.hour, minute: dateTime.minute),
super(key: key);
final DateTime date;
final TimeOfDay time;
final ValueChanged<DateTime> onChanged;
@override
Widget build(BuildContext context) {
return new Row(
children: <Widget>[
new Expanded(
child: new InkWell(
onTap: (() => _showDatePicker(context)),
child: new Padding(
padding: new EdgeInsets.symmetric(vertical: 8.0),
child: new Text(new DateFormat('EEEE, MMMM d').format(date))),
),
),
new InkWell(
onTap: (() => _showTimePicker(context)),
child: new Padding(
padding: new EdgeInsets.symmetric(vertical: 8.0),
child: new Text('$time')),
),
],
);
}
Future _showDatePicker(BuildContext context) async {
DateTime dateTimePicked = await showDatePicker(
context: context,
initialDate: date,
firstDate: date.subtract(const Duration(days: 20000)),
lastDate: new DateTime.now());
if (dateTimePicked != null) {
onChanged(new DateTime(dateTimePicked.year, dateTimePicked.month,
dateTimePicked.day, time.hour, time.minute));
}
}
Future _showTimePicker(BuildContext context) async {
TimeOfDay timeOfDay =
await showTimePicker(context: context, initialTime: time);
if (timeOfDay != null) {
onChanged(new DateTime(
date.year, date.month, date.day, timeOfDay.hour, timeOfDay.minute));
}
}
}
|
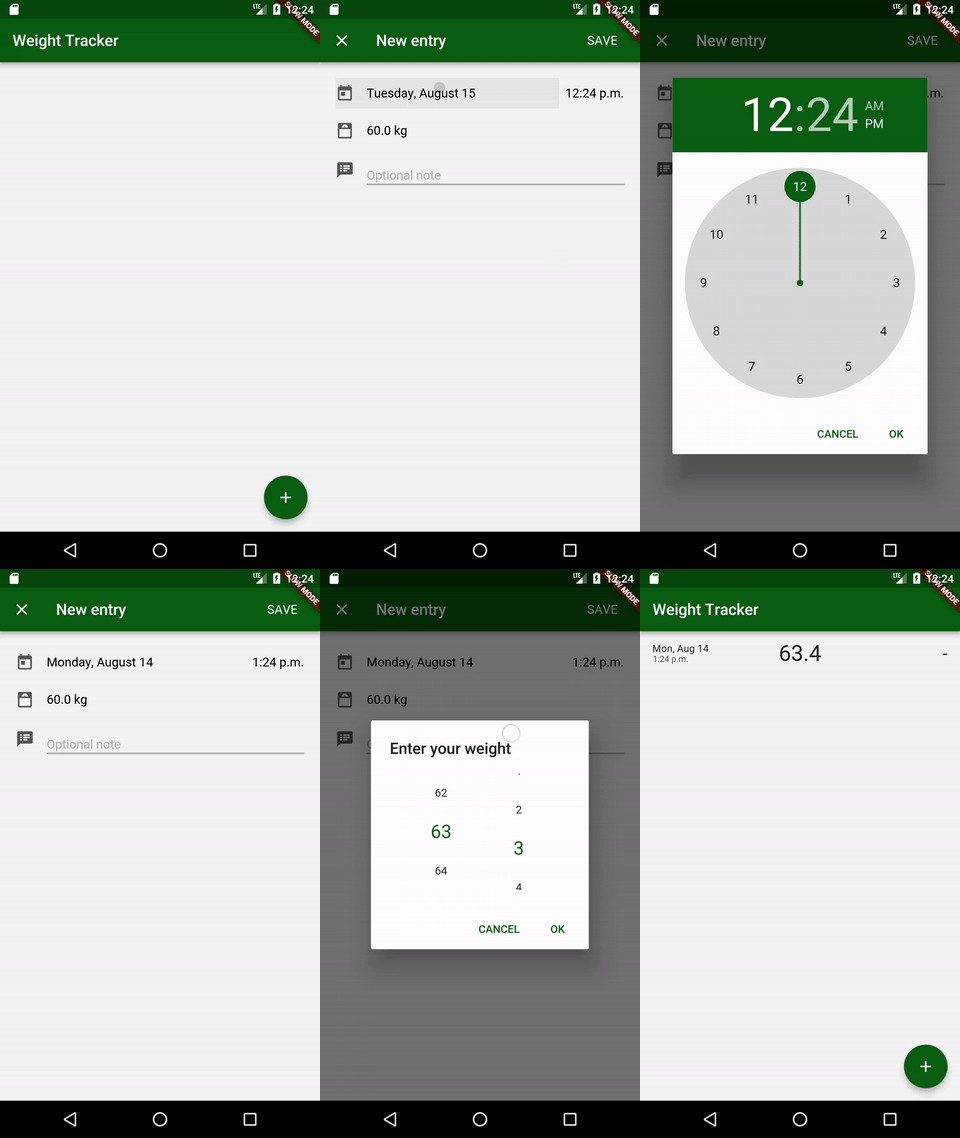
DateTimeItem是一个我从Flutter的Gallery应用中借来的类,并且作了一些小改动。它一行中包容两个文字部件。第一个显示日期,当点击它的时候会弹出一个DatePicker(日期选择器)让用户选一个时间。同样的第二个文字部件显示的时间选择器让用户选择一天中的时间。
当用户做了这些事后,我们使用从构造器传入的日期值简单的创建了一个新的DateTime对象并通过onChange方法传递它。然后父类调用setState方法从新的DateTime对象更新UI为用户所选的日期。
选择一个重量
1
2
3
4
5
6
7
8
9
10
11
12
| new ListTile(
leading: new Image.asset(
"assets/scale-bathroom.png",
color: Colors.grey[500],
height: 24.0,
width: 24.0,
),
title: new Text(
"$_weight kg",
),
onTap: () => _showWeightPicker(context),
),
|
1
2
3
4
5
6
7
8
9
10
11
12
13
14
15
| _showWeightPicker(BuildContext context) {
showDialog(
context: context,
child: new NumberPickerDialog.decimal(
minValue: 1,
maxValue: 150,
initialDoubleValue: _weight,
title: new Text("Enter your weight"),
),
).then((value) {
if (value != null) {
setState(() => _weight = value);
}
});
}
|
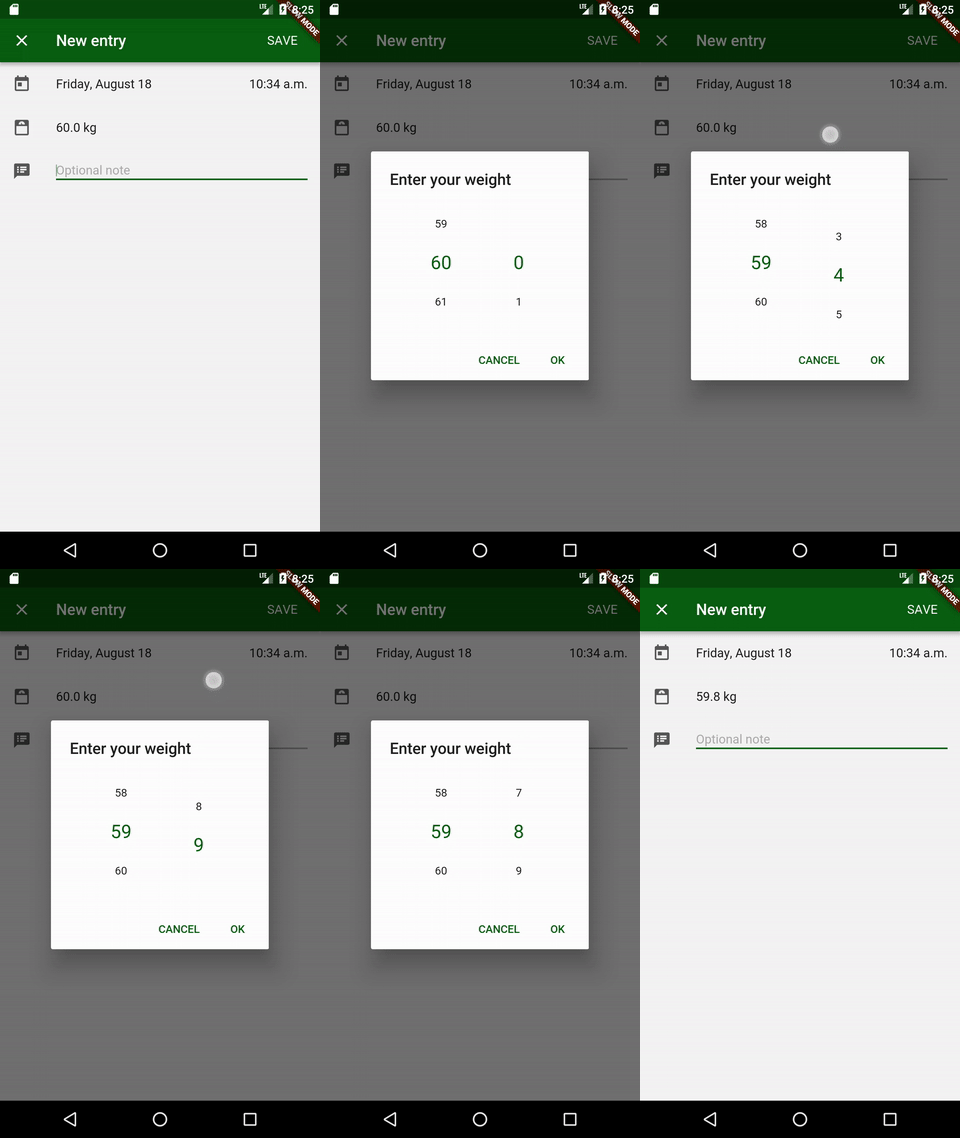
为了选择一个重量我决定使用简单的ListTile,点击它将打开一个NumberPickerDialog(如果你对NumberPicker感兴趣,你可以在这里找到它)。当选择完重量后更新状态。我加进asset的头部图片是来自http://www.materialdesignicons.com/。
添加一个备注
1
2
3
4
5
| @override
void initState() {
_textEditingController = new TextEditingController(text: _note);
super.initState();
}
|
1
2
3
4
5
6
7
8
9
10
| new ListTile(
leading: new Icon(Icons.speaker_notes, color: Colors.grey[500]),
title: new TextField(
decoration: new InputDecoration(
hintText: 'Optional note',
),
controller: _textEditingController,
onChanged: (value) => _note = value,
),
),
|
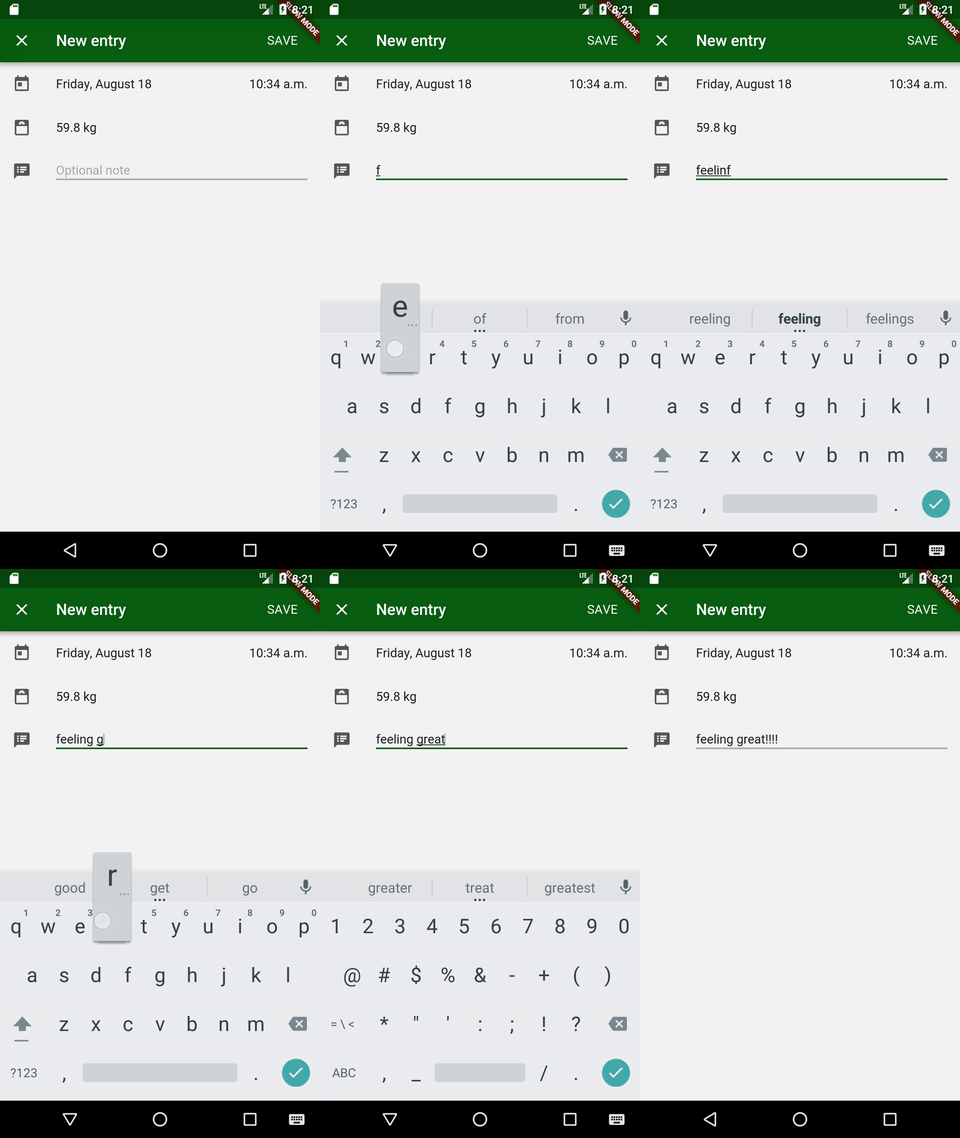
添加备注我决定使用简单的TextField。我的这个选择只是因为足够满足我的需求,不确定这是否是最好的选择。我们在initSate方法创建一个TextEditingController只是为了当_note存在的时候用这个值去构建TextField。此外,当TextField被修改时我们每次都会更新_note这个变量。
结语
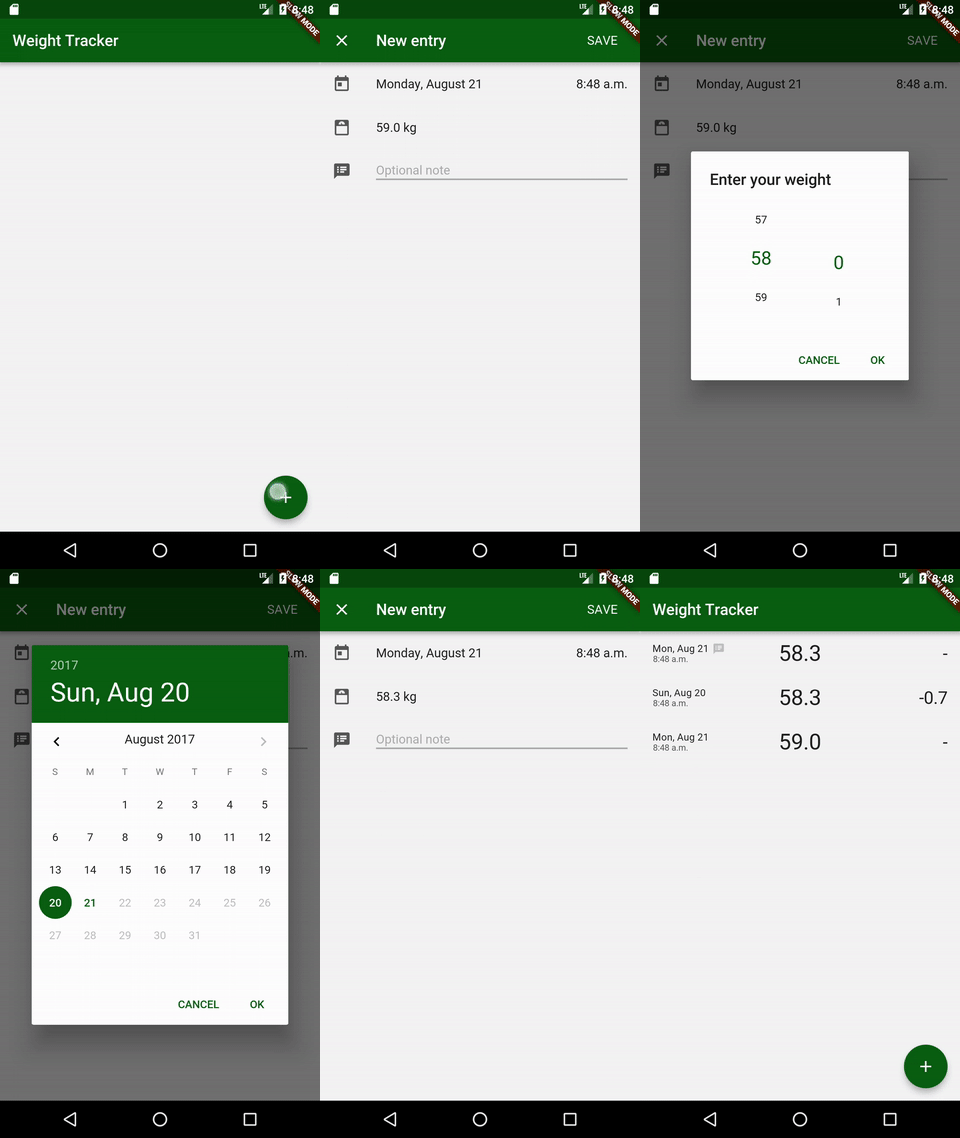
有一个值得注意的是当用户没有保存数据就退出对话框时我没有创建一个确认对话框。我只是简单的觉得在我的例子中不需要这样。
同样的我决定添加一个选项让重量条目能被添加或修改,这是一个非常容易的事。使用名称构造器(我介绍过两种使用WeightEntryDialog的方法)当我们提供了旧的数据时我们使用它显示对话框的内容,当然我们也可以创建一个新的。
我希望你喜欢这篇文章。在Flutter中创建全屏对话框似乎非常简单,我很高兴Flutter创建了这样的工具。如果你有什么疑问或者你觉得你可以改进我的方案,请在下方留言,我非常乐意一起讨论。
就这样,朋友们!
你可以在这里找到整个项目。


